Here are instructions for assembling the MPHS produced 1150 series caboose in HO scale.
Originally posted by Kevin Love, 26 December, 2019
Here are instructions for assembling the MPHS produced 1150 series caboose in HO scale.
Originally posted by Kevin Love, 26 December, 2019
| Type of Model | Manufacturer | Kit Number | Scale | Name of Model | Material Used | Availability or Comments |
|---|---|---|---|---|---|---|
| Open Top Hopper | Exactrail | HO | Bethlehem 3737 hopper 1973 Small Eagle logo | Plastic RTR | https://www.exactrail.com/model-trains?scale=152 | |
| Open Top Hopper | Exactrail | HO | Bethlehem 3737 hopper 1973 CEI | Plastic RTR | https://www.exactrail.com/model-trains?scale=152 | |
| Open Top Hopper | Exactrail | HO | Bethlehem 3737 hopper 1974 TP lettering | Plastic RTR | https://www.exactrail.com/model-trains?scale=152 | |
| Gondola | Exactrail | HO | Greenville 65’ Corrugated-side Mill gondola (Screaming Eagle) | Plastic RTR | ||
| Boxcar | Exactrail | HO | Gunderson 50’ 5200 Double Door Boxcar (Buzz saw) | Plastic RTR | ||
| Boxcar | Exactrail | HO | Berwick 7327 60’ Boxcar (Buzz saw) | Plastic RTR | ||
| Vert-a-pak | Exactrail | HO | 89’ Vert-a-pak Auto Carrier (Buzz saw) | Plastic RTR | ||
| Covered Hopper | Tangent | HO | Mopac PS PS-2CD 4740 Covered Hopper | Plastic RTR | ||
| Covered Hopper | Athearn RTR | HO | ACF 2970 Covered Hopper; (T&P Reporting Marks) | Plastic RTR | ||
| Covered Hopper | Athearn RTR | HO | ACF 2970 Covered Hopper; (Repaint w/Screaming Eagle Scheme) | Plastic RTR | ||
| Airslide Hopper | Athearn RTR | HO | GATX Paired Airslide Hoppers; (Screaming Eagle Scheme) | Plastic RTR | ||
| Covered Hopper | Athearn RTR | HO | ACF 4740 Covered Hopper (Buzz saw) | Plastic RTR | ||
| Boxcar | Athearn RTR | HO | ACF Rail box-Type Boxcar (T&P Reporting Marks) | Plastic RTR | ||
| Boxcar | Athearn RTR | HO | FMC Combo Box DD (MP Buzz saw) | Plastic RTR | ||
| Flatcar | Athearn RTR | HO | 60’ Bulkhead Flat (Screaming Eagle) | Plastic RTR | ||
| Flatcar | Athearn RTR | HO | 60’ Flat car (Buzz saw) | Plastic RTR | ||
| Boxcar | Athearn RTR | HO | 50’ Evans Double Plug Door (Buzz saw) | Plastic RTR | ||
| Trailer | Athearn RTR | HO | 45’ TOFC Fruehauf Trailer (Screaming Eagle) | Plastic RTR | ||
| Trailer | Athearn RTR | HO | 40’ TOFC Fruehauf Trailer (Buzz saw) | Plastic RTR | ||
| Flatcar | Athearn Genesis | HO | 60’ wood deck flat car (Screaming Eagle RTR) | Plastic RTR | ||
| Boxcar | Athearn Genesis | HO | 50’ PC&F Boxcar (Buzz saw) | Plastic RTR | ||
| Boxcar | Athearn Genesis | HO | 60’ ICC Box car (Screaming Eagle) | Plastic RTR | ||
| Boxcar | Athearn Genesis | HO | 60’ Outside Brace Waffle Box (Screaming Eagle) | Plastic RTR | ||
| Covered Hopper | Intermountain Railway Company | HO | ACF 4650 Covered Hopper (Screaming Eagle RTR) | Plastic RTR | ||
| Covered Hopper | Intermountain Railway Company | HO | ACF 4650 Covered Hopper (C&EI Buzz saw RTR) | Plastic RTR | ||
| Covered Hopper | Intermountain Railway Company | HO | ACF 2980 Covered Hopper (Screaming Eagle RTR) | Plastic RTR | ||
| Covered Hopper | Intermountain Railway Company | HO | ACF 2980 Covered Hopper (C&EI Buzz saw KIT) | Plastic – kit | ||
| Boxcar | Atlas Master | HO | ACF Precision Design 60’ Boxcar (MP Buzz saw) | Plastic RTR | ||
| Boxcar | Atlas Master | HO | ACF Precision Design 50’ Boxcar (MP Buzz saw) | Plastic RTR | ||
| Boxcar | Atlas Master | HO | ACF Precision Design 50’ Boxcar (T&P w/MP Buzz saw) | Plastic RTR | ||
| Covered Hopper | Atlas Master | HO | ACF 6 bay Cylindrical Hopper (MP Eagle) | Plastic RTR | ||
| Covered Hopper | Atlas Master | HO | ACF 6 bay Cylindrical Hopper (MP Buzz saw) | Plastic RTR | ||
| Boxcar | Atlas Master | HO | Evans 52’ Double Plug Door Box (ARMH w/MP Buzz saw) | Plastic RTR | ||
| Boxcar | Atlas Master | HO | Evans 52’ Double Plug Door Box (TNM w/MP Buzz saw) | Plastic RTR | ||
| Covered Hopper | Atlas Trainman | HO | Thrall 4750 Covered Hopper (MP Eagle w/CHTT Reporting Marks) | Plastic RTR | ||
| Caboose | Atlas Trainman | HO | “Magor-style” caboose-Vermillion Paint with Buzz saw) | Plastic RTR | ||
| Covered Hopper | Accurail | HO | ACF 4600 Covered Hopper (Screaming Eagle) | Plastic RTR | ||
| Covered Hopper | Accurail | HO | ACF 4600 Covered Hopper (C&EI Buzz saw) | Plastic RTR | ||
| Covered Hopper | Accurail | HO | ACF 4600 Covered Hopper (MP reporting marks; UP shield) | Plastic RTR | ||
| TOFC | Accurail | HO | 89’ 4” TOFC Flat Car (MP Screaming Eagle) | Plastic RTR | ||
| Auto-Carrier | Accurail | HO | 89’ Auto Carrier-Corrugated Siding (MP Buzz saw) | Plastic RTR | ||
| Boxcar | Accurail | HO | 50’ Welded Plug Door Boxcar (Buzz saw) | Plastic RTR | ||
| Boxcar | Moloco | HO | GATX 50’ RBL Boxcar Kit (undecorated w/Mask Island Decals Buzz saw) | Plastic RTR | ||
| Flatcar | Walthers | HO | 50’ GSC Flat Car (Buzz saw) | Plastic RTR | ||
| Airslide | Walthers | HO | 50’ 2-bay Airslide (Buzz saw) | Plastic RTR | ||
| Hopper | Walthers | HO | 69’ Greenville Woodchip Hopper (Screaming Eagle) | Plastic RTR | ||
| Airslide | Walthers | HO | 50’ 2-bay Airslide (Screaming Eagle) | Plastic RTR | ||
| Hopper | Walthers | HO | 69’ Greenville Woodchip Hopper (Buzz saw) | Plastic RTR | ||
| Airslide | Walthers | HO | 84’ Paired Airslide (Screaming Eagle) | Plastic RTR | ||
| Hopper | Walthers | HO | 41’ Ballast Hopper (Screaming Eagle) | Plastic RTR | ||
| Dump car | Walthers | HO | 50’ DIFCO Dump Car (Oxide Red) | Plastic RTR | ||
| Dump car | Walthers | HO | 50’ DIFCO Dump Car (Ecology Green with MP reporting marks) | Plastic RTR | ||
| Caboose | Bluford Shops | HO | Short Bay Window Caboose | Plastic RTR | http://mopac.org/index.php/store/item/48-bluford-shops-ho-scale-mopac-sbw-caboose |
Originally posted by Charlie Duckworth, 21 June, 2014
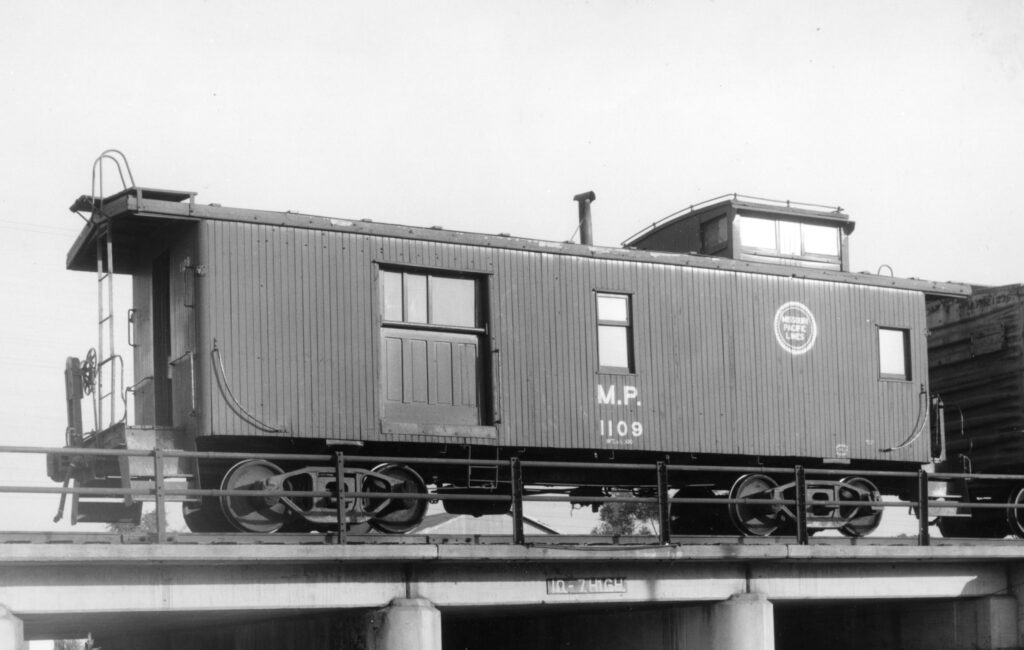
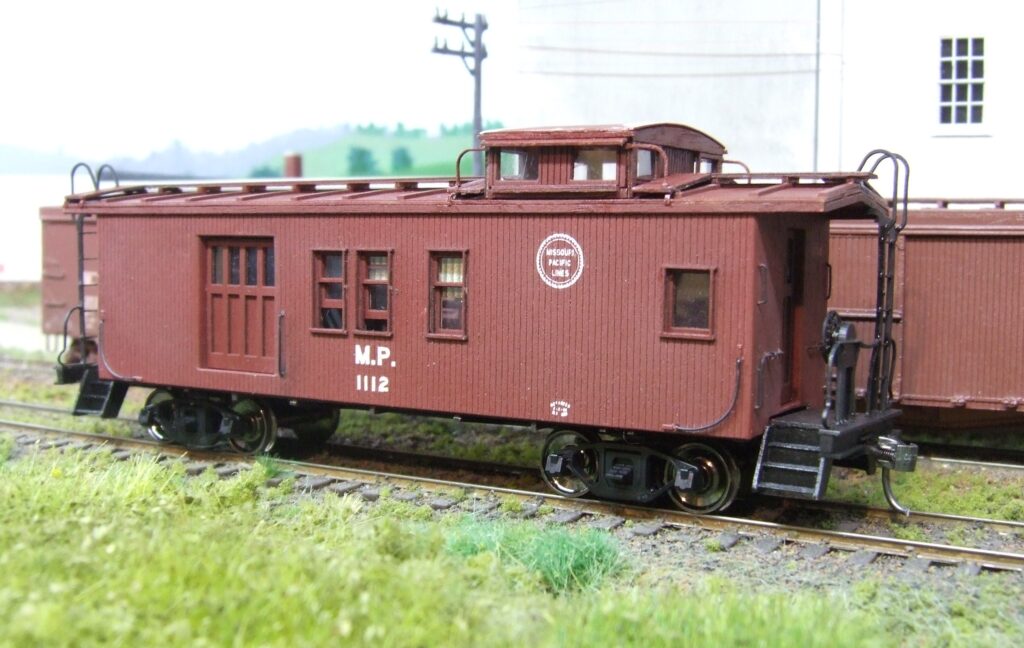
Following are notes from the Mopac Modeling Group Build on building the AMB HO Mopac Drovers and LCL Drovers cabooses. Reference materical are ‘The Eagle’ Fall 1992 on the prototype cabooses with photos and diagrams and ‘The Eagle’ Fall 2010 ‘The Mopac Modeler: MP Drovers Caboose by Bill Herbert. Another reference is Cabooses of the Missouri Pacific Lines by Jerry Michels.

Part 1.
Here’s a list of what’s needed to built the AMB drovers/LCL caboose:
Part 2
Part 3
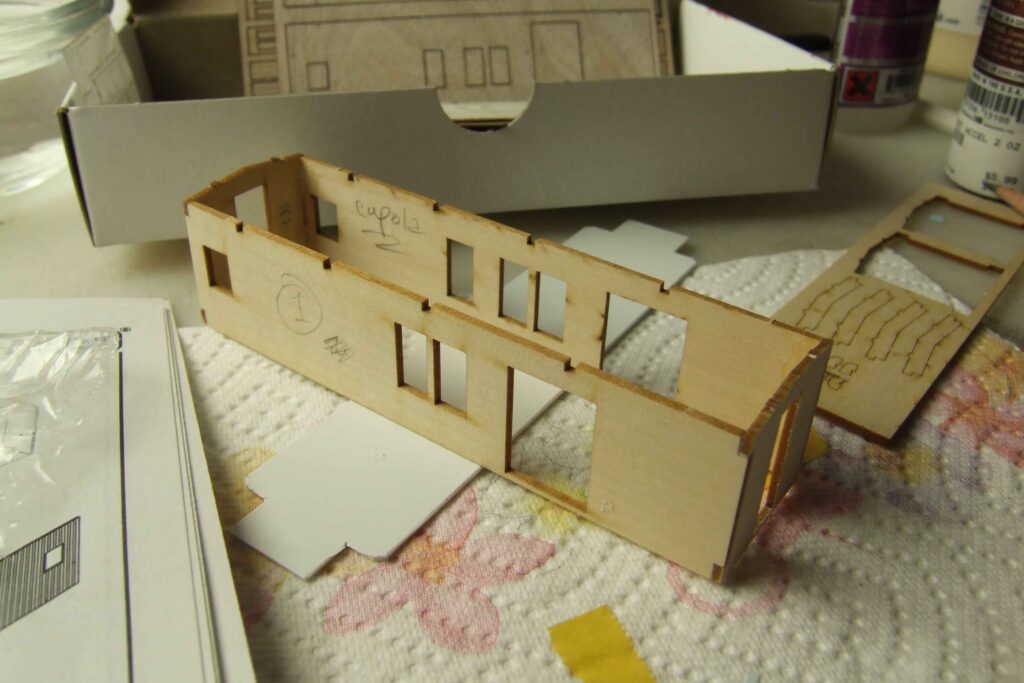
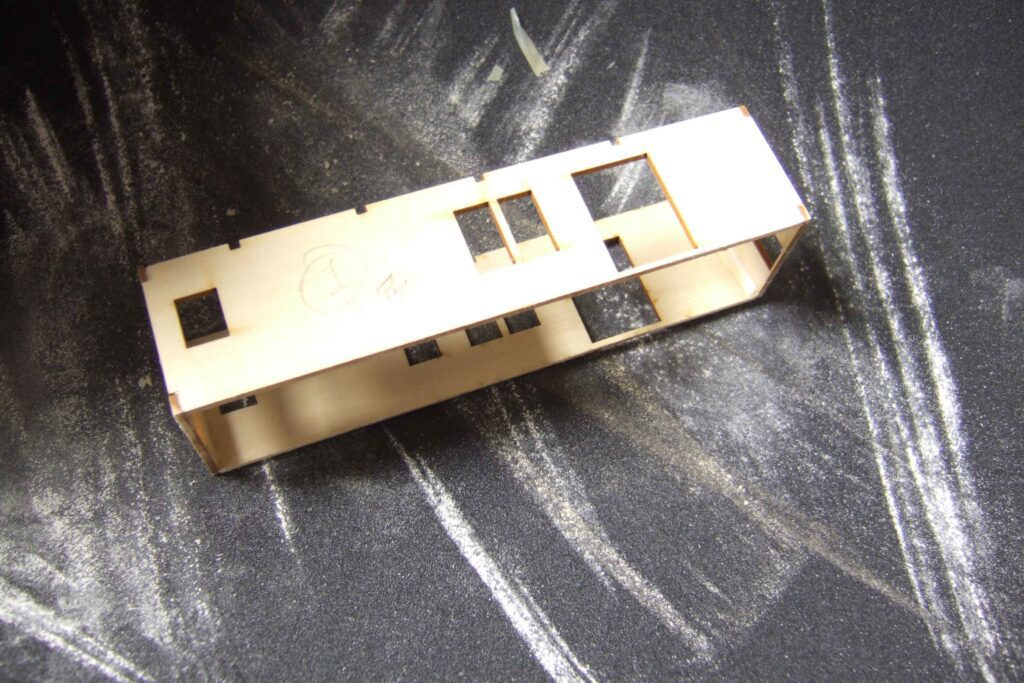
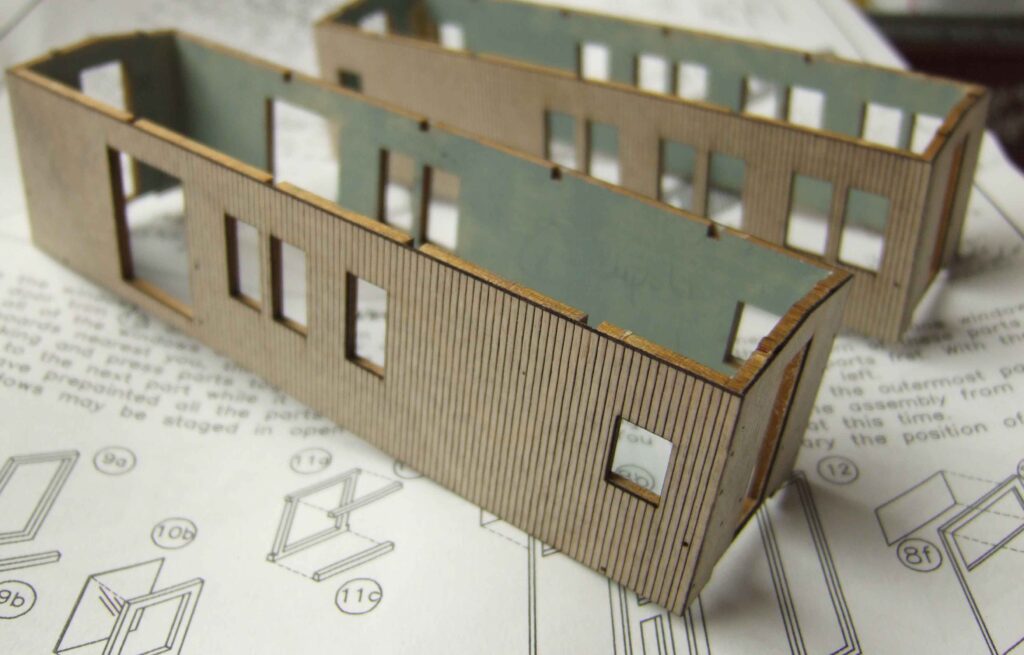
After the sub-carbody is dry you can now add the exterior ends and walls.
After I got the basic carbody built, I primed it with Dupli-color Sandable Primer (DAP 1694 Red Primer) as I don’t want to take any chances with seeing wood grain on my finished model. Talked to Bill Herbert, how’s built several of these and he doesn’t use primer – so it’s your choice. Next step is to add a scale HO 6″ radius on each of the corners and on the sides of the LCL door. Page 6 of the AMB instructions shows a great illustration. Getting back to the primer being used it helps you to see how much sanding you are doing having the red primer on the surface.
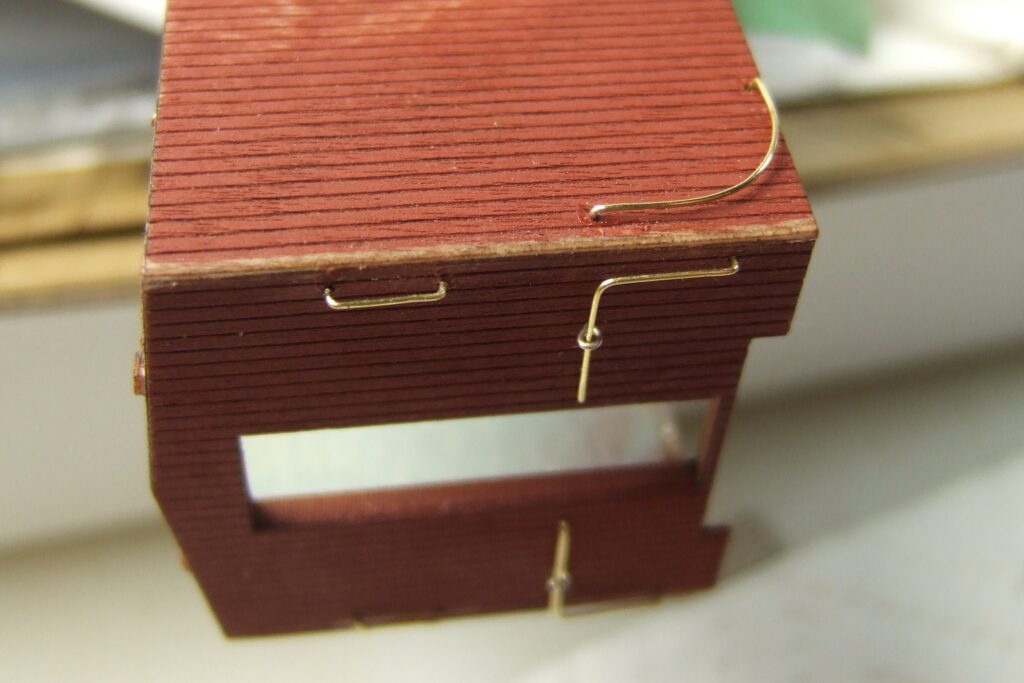
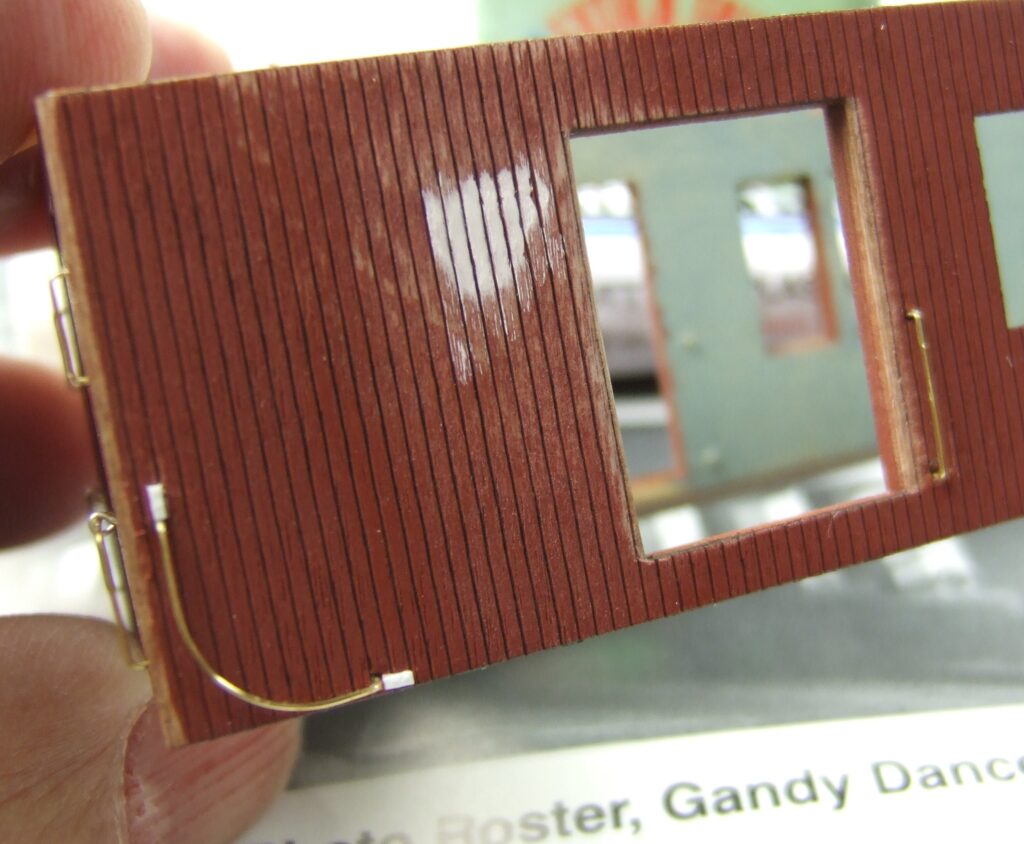
I want to paint and decal the carbody before adding the windows and doors as they have glazing. So I jumped to page 11 and added the wire hand grabs. Bill Herbert, in his article used .010 wire in lieu of the .015 supplied in the kit. I used .012 as that’s what was in my supply. I am thinking of adding NWS small bolt/nuts details to the ends of the wire where they go into the carbody haven’t got there yet. I also noticed a piece of the siding that has a strange impression in the wood. Am going to see if another coat of sanding primer will hide it or I may use a light coat of Tamiya putty as filler or may just ignore it – not sure yet.
I was able to fix the dent in the wood this morning by mixing Tamiya’s white model putty and their thin plastic cement. I then took a small brush and when over the area – trying not to fill in the groves. After it was dry I lightly sanded the area.
I also made the riveted parts for the end of the side curved hand holds. I took a piece of 1″ x 2″ Evergreen stock and used an awl to make two rivet heads and then acc’d on the car body at each end. After the glue drys you can then use a single edged razor blade to make the piece narrower to match the prototype shots.

I asked Ed Hawkins about painting the drovers caboose – here’s his reply:
“Regarding the caboose color, for the early 1950s I think there are two options depending on how long it’s been since being repainted. As I recall you’re modeling ca. 1953.
If you prefer the caboose to look like it’s been 5-8 years since being repainted, I recommend using the mix of 3 parts TCP-82/1 part TCP-19 (also lightening the mix with a little light gray and weathered accordingly). If you want the caboose to look like it was more recently repainted, I recommend using TCP-188.
The TCP-188 color has a little more red than the mixed color. The mixed color is slightly more brownish like MoPac used right after World War II on the box cars built 1945-1946 (and possibly later).
Unfortunately, I know of no paint specs for MoPac freight cars built or repainted 1947 through 1958 except for the Eagle Merchandise cars. This 12 year period was when MoPac was building all of their own box cars, stock cars, and cabooses, and I know of no source that specifies what paints MP used during this period. All we have to go by are some color photos, which gives us a good idea that the color should be TCP-188 for a while before changing to TCP-139 (even more red) during the late 1950s to early 1960s.
If you like the color we used on the Branchline box cars, TCP-188 is a near perfect match to them”.
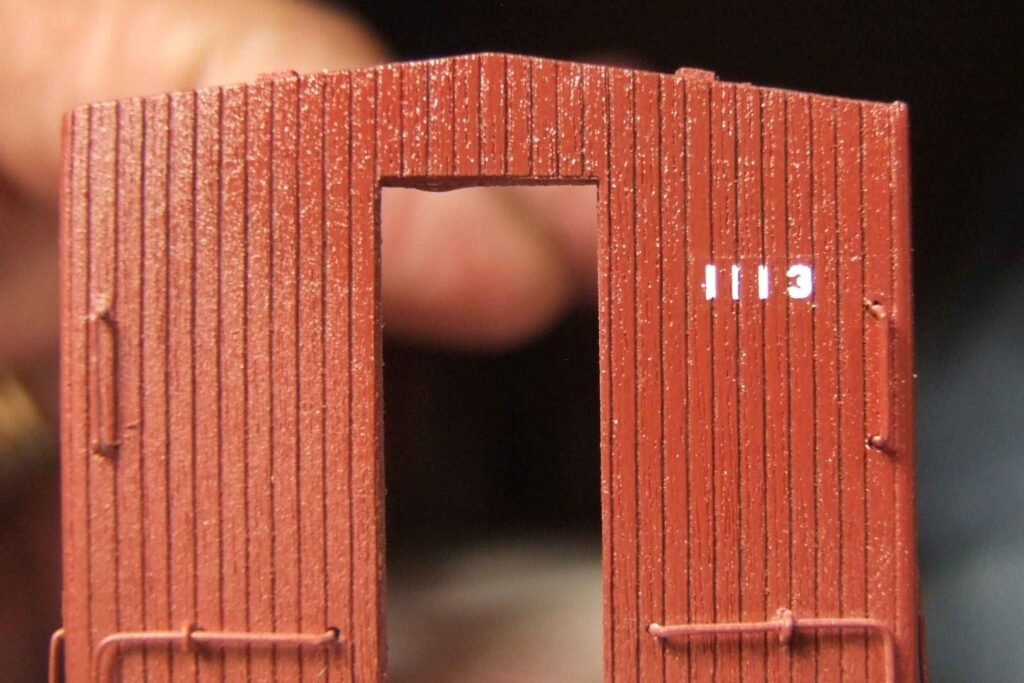
I’m not exactly following the instructions in the drovers caboose kit. Before you can go to far you need to paint and decal the carbody so the doors and windows can be added. Per Ed Hawkins recommendation I used Tru-Color 188 for the exterior. While others have written they can decal directly on the base color I add a gloss coat for added insurance – there’s nothing that detracts more on a model that having the decals ‘silvering’.
After spraying the color and gloss I set these pieces aside and started on the underframe (step 23 in the instructions). Everything went well but I might add that using a piece of brass .015 wire will help in lining up the holes in parts 41 and 51a.
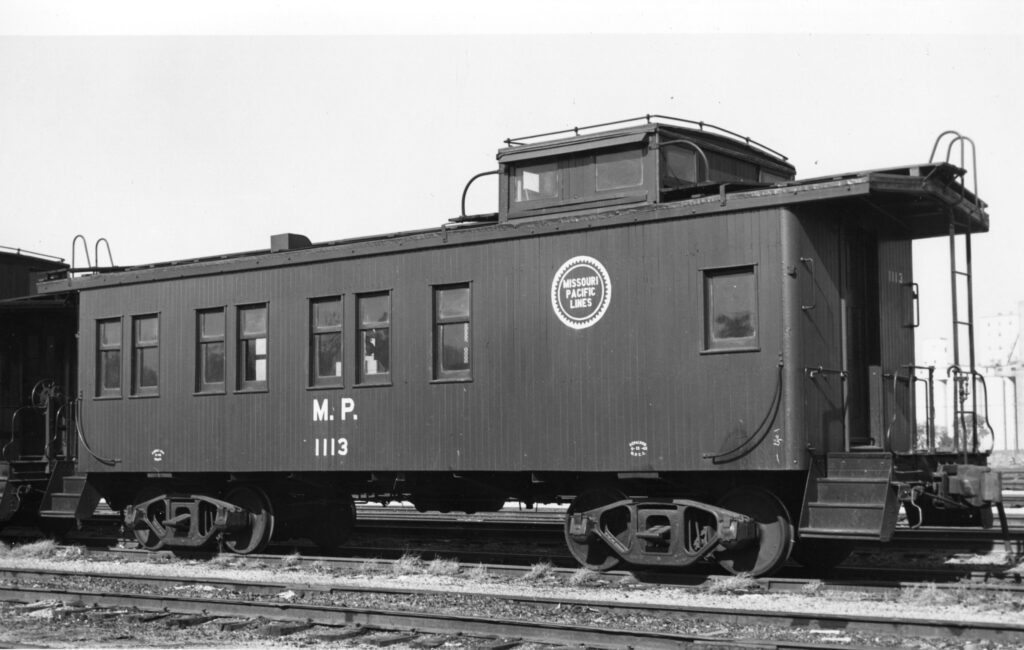
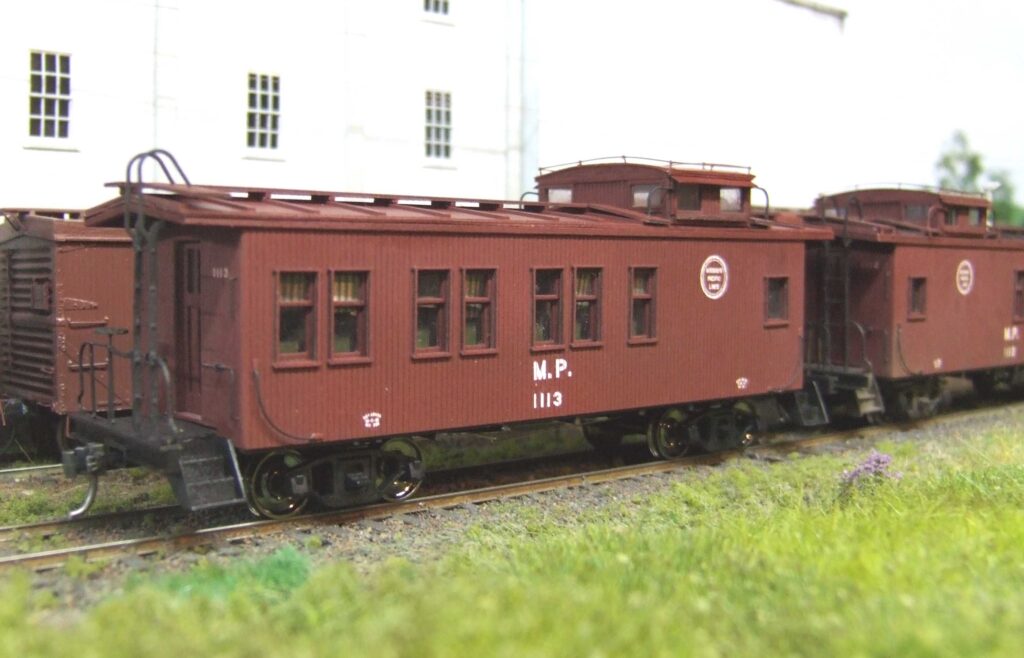
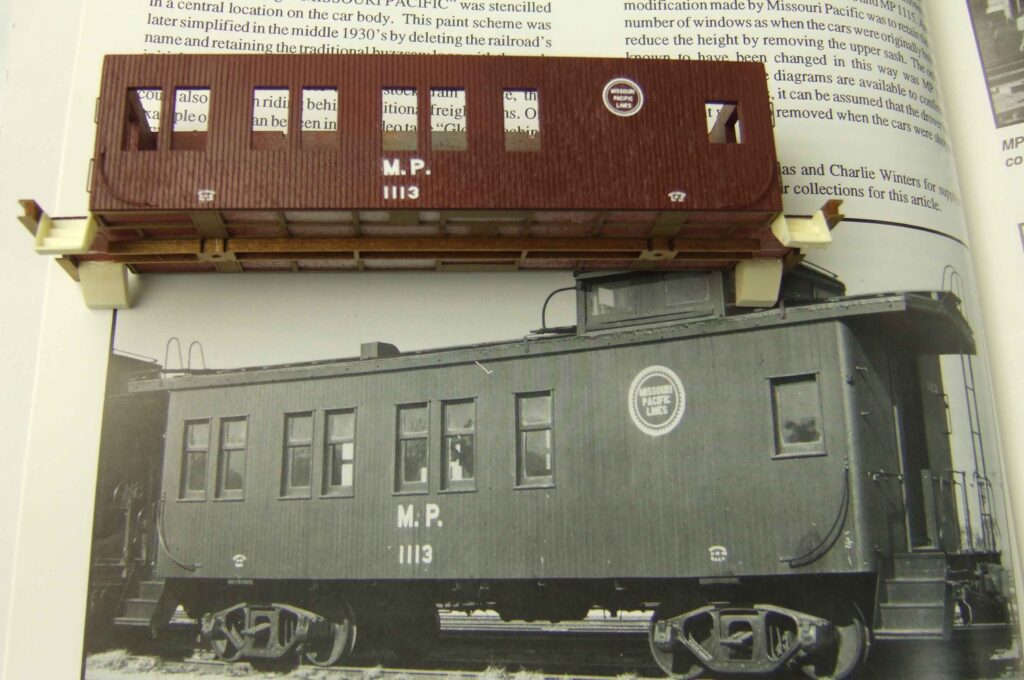
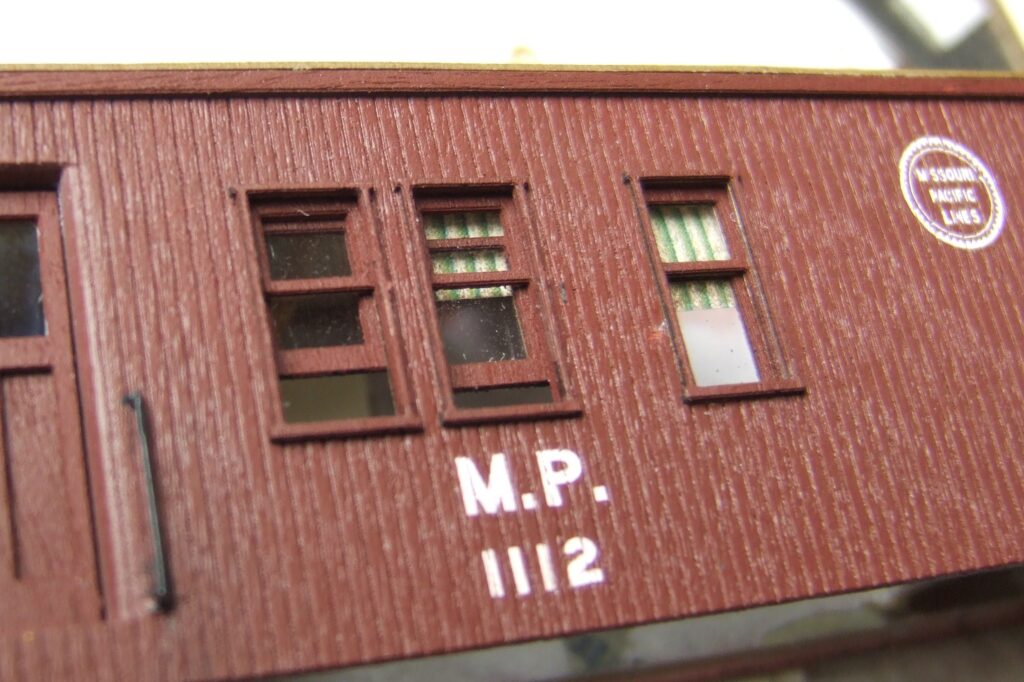
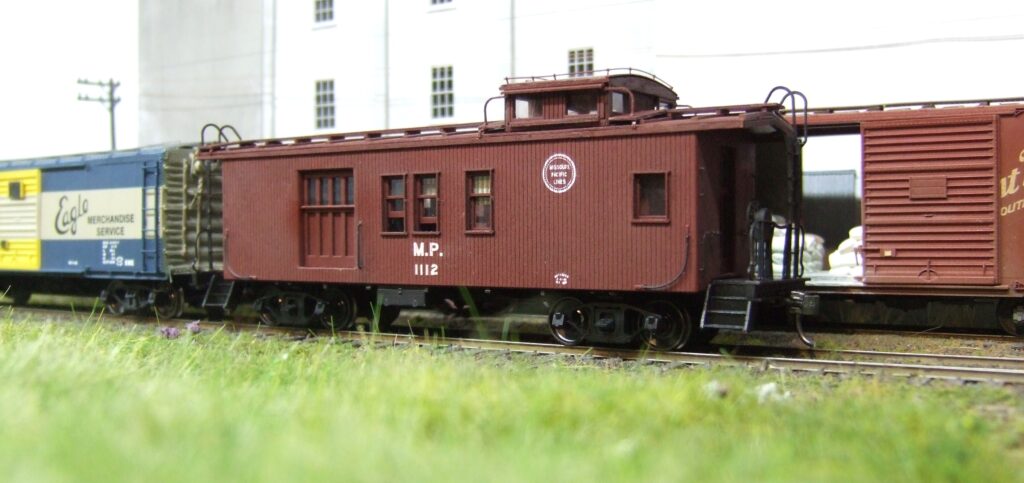
Am decaling the drovers as caboose 1113. When comparing the decals to the prototype shot you’ll need to spread out the M.P. lettering and make the 1113 numbers closer together to match the photo. The end numbers center on the right side near the top of the handhold. Before starting on step 26 I numbered parts 31 and 33 on the sheet before I cut them out as they look very similar after you have them out. I used Microset Red and Walthers Solvaset to get the decals to lay flat into the scribed siding.
This is a continued step ‘5’ for the Drover’s build.
– Today finished the underframe on both cabooses and sprayed it with Tamiya flat black.
– Added weights to the interior and glued down with ‘Liquid Nails’ as I don’t want the weight coming off the floor after everything is buttoned up.
– Added the two end doors; in looking at the photos they are slightly inset from the ends.
– Tapped the bolsters for 2-56 screws for mounting the trucks.
– Added the two baggage doors to the LCL caboose. Used Elmer’s wood glue in lieu of acc as acc will fog the clear plastic glass as it dries.
– Added the Tahoe 104 caboose trucks Tahoe Model Works #104 Bettendorf Swing Motion Trucks – HO Scale
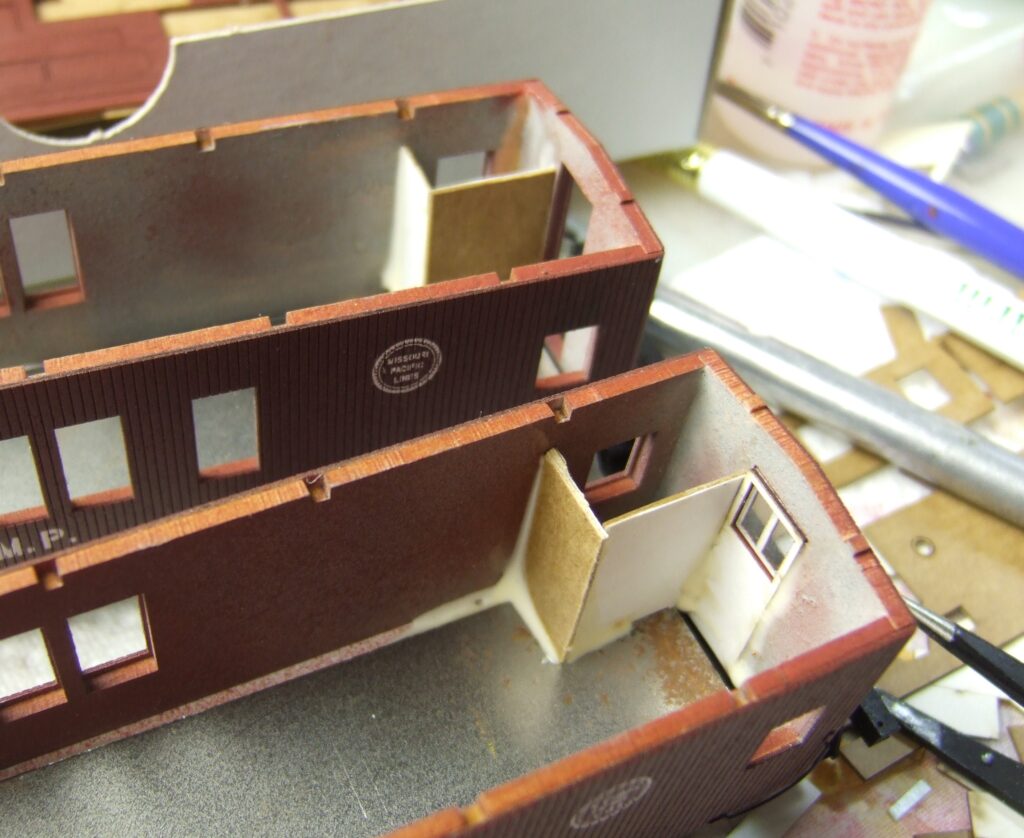
– Cut up the leftover card stock and added walls for the toilet areas in both cabooses. Will paint gray when it dries.
– Painted the hand hold, steps and platforms black.


Caboose step 6
– (AMB instructions step 3) finished adding the windows, rather than using a full sheet (7c), I cut the clear sheet with a single edged razor blade and place one part on the upper sash and the other part on the lower sash. This takes a little time but the end result is worth the trouble as th ewindows are more realistic. This process also lets you show the windows opened, if you want.
– in looking at the prototype windows I don’t see parts 9b, 11c being used so I elected to leave them off. I also don’t see the framing around the ends doors (12) being on the prototype either so it was left off as well.
– I used a dark brown pencil and added some soiling to the window shades before I glued them in place.
– after the windows were inserted I used a small detail brush and went around the inside walls and windows with Elmer’s white glue. I don’t want to take the chance of the windows coming out after the car is finished.
– (instructions step 4), no additional comments, just followed the steps.
– (instructions 10 and 11). Added the roof (14) and flipped the car over and added acc to the area between the inside of the roof and inside walls. To ensure the roof fit snug hold down the edge of the roof with a steel ruler until the glue sets up.
– I use Tamiya putty in the areas were the tabs come through the roof, after it drys sand so that its flush. This step is to ensure there’s no small dips in the paper roof (part 18) when it’s applied.
Step 7
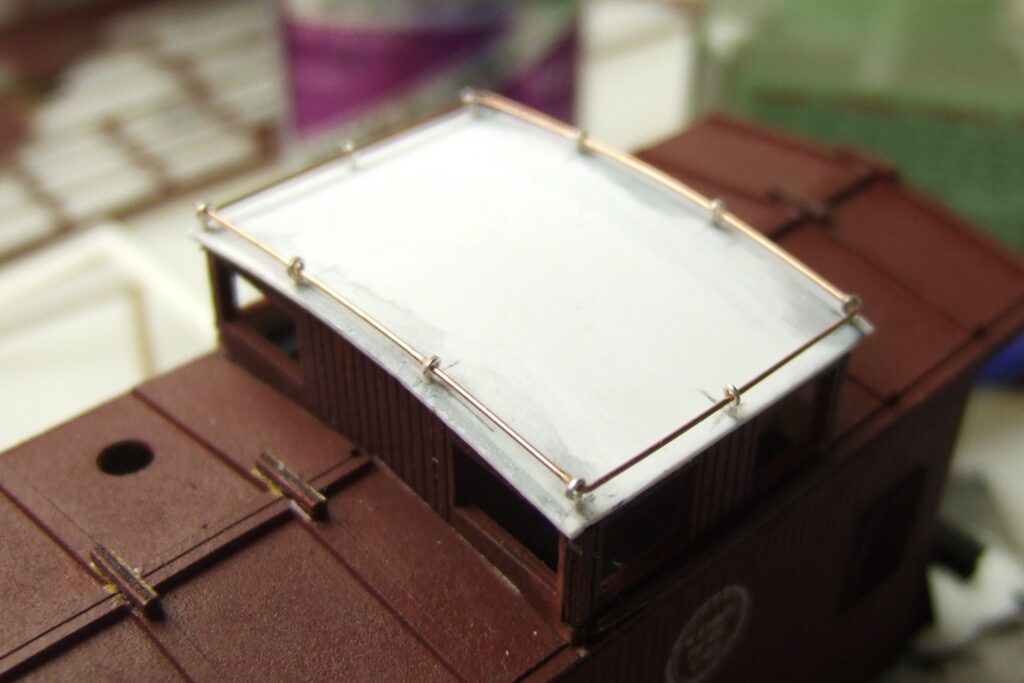
After finishing the carbody roof, the cupola assembly was next. I have to admit that I’ve never had any luck with using the cupola kit cardstock roof on any of my prior builds and figured this one would be no different. I will leave out the gory details but ended up tossing part 27 and made a new one from .015 Evergreen sheet styrene. I like using the plastic better as you can cut it a little over size and the sand the edges until it matches the photos. The .015 plastic is also great for drilling the .078 holes for the eyelets as you have a little more surface to hold the wire in place. You only get one shot with the cardstock so if you use it your a better modeler than I. 8^)
After I got the cupola roof glued and sanded I used part 28 as a pattern to mark the location for the 10 holes and drilled them out. Then Details Associates (2206) eyelets were added and the wire was installed around the roof. Everything was then ACCd in place.
I substituted a piece of HO 2″ x 2″ for part 25 as it was a little smaller. Interesting, part 62 it wasn’t cut out on my cardstock on one kit but was in the other. It really didn’t matter as it’s too short anyway and I ended up cutting replacements from the extra cardstock and gluing them in place. AMB probably noticed the part was too short and deleted it but forgot to add a corrected part. Anyway it’s a easy fix to make two new ones.
Kadee #58’s were added to the underframe. I did cut back the end of the wood underframe about a scale 12″ so the coupler pocket could be set back more to match the prototype photos.

Step 8 is basically just following the instructions. Make use you don’t get parts 51 and 52 confused or the ladder will be wrong. I looked for the ladder jig in the box thinking it was made out of the card stock but then realized you need to cut it out of the instruction sheet. Actually, the ladders went pretty quickly.
After the ladder was built I soaked it with thin acc glue to add some strength. Then brush painted everything with acrylic black. Next will add the brake parts and the railing on top the cupola and add some light weathering and call this one finished.
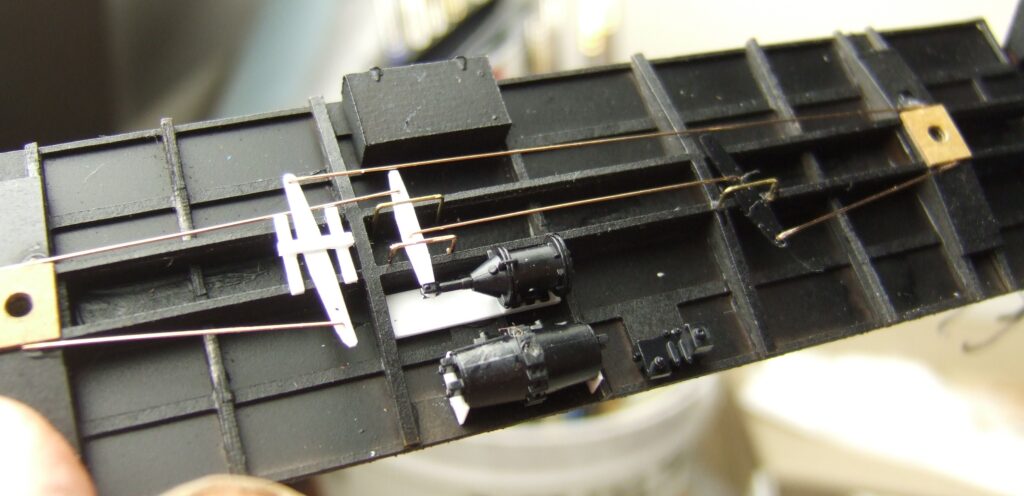
Replaced the railing around the top of the cupola with .010 wire and Yarmouth Model Works eyelets. The eyelets made for .010 wire are tiny and really help the model look more scale-like. The underframe was built next using Bill Herbert’s photo of the AB brake system he made for this LCL caboose. I used Cal-scale’s AB plastic brake set and them made the various levers from Evergreen 1″ x 6″ pieces. The brake cylinder brackets were made from 1″x 10″‘s. Underframe wire is .010. The metal rail in the baggage door area was made from .032 brass (see photo at the bottom of this page). Will use military dry pigments to weather the bottom of the carbody and underframe.


Originally published by Charlie Duckworth, 13 June, 2014
Work on this list is ongoing and should not be considered complete any missing models should be sent to [email protected].
| Type of Model | Manufacturer | Kit Number | Scale | Name of Model | Material Used | Availability (2014) |
|---|---|---|---|---|---|---|
| Freight Car | Accurail | 4600, 4699 | HO | MP USRA Boxcar | Plastic kit | Yes |
| Freight car | Atlas | 20 000 176 | HO | IGN 17144 ARA 1932 Boxcar | Plastic RTR | Yes |
| Freight car | Atlas | 20 000 177 | HO | IGN 17149 ARA 1932 Boxcar | Plastic RTR | Yes |
| Freight car | Funaro & Camerlengo | 6140 | HO | MP 45′ gondola non-panel | Resin casting | http://fandckits.com/HOFreight/6140.html |
| Freight car | Funaro & Camerlengo | 6141 | HO | MP 45′ gondola panel sides | Resin casting | http://fandckits.com/HOFreight/6141.html |
| Freight car | Funaro & Camerlengo | 6143 | HO | MP 45′ gondola panel sides – one piece body | Resin casting | http://fandckits.com/HOFreight/6143.html |
| Freight car | Funaro & Camerlengo | 6812 | HO | MP 1932 ARA Boxacr | Resin Casting | http://fandckits.com/HOFreight/6812.html |
| Freight car | Sunshine Models | 1.1 | HO | MP 45′ Gondola Panel Sides | Resin Casting | OOP check ebay or Train Swap meets |
| Freight car | Intermountain | 46603 | HO | MP USRA Composite gondola | Plastic and wood RTR | Available |
| Freight car | Sunshine Models | 1.2 | HO | MP 45′ Gondola Non-panel Sides | Resin Casting | OOP check ebay or Train Swap meets |
| Freight car | Sunshine Models | 9.1 | HO | T&P 82000 Rebuilt Boxcar | Resin Casting | OOP check ebay or Train Swap meets |
| Freight car | Sunshine Models | 14.1 | HO | ART Wood Reefer w/ Metal sheathed hatches | Resin Casting | OOP check ebay or Train Swap meets |
| Freight car | Sunshine Models | 14.2 | HO | ART Wood Reefer w/ Equipo Hatches | Resin Casting | OOP check ebay or Train Swap meets |
| Freight car | Sunshine Models | 19.1 | HO | MP 36′ 120000 Wood DS Boxcar | Resin Casting | OOP check ebay or Train Swap meets |
| Freight car | Sunshine Models | 19.1R | HO | MP 36′ 120000 Wood DS Boxcar Indented Murphy Ends | Resin Casting | OOP check ebay or Train Swap meets |
| Freight car | Sunshine Models | 19.2 | HO | MP 36′ 120000 Wood DS Boxcar Indented Murphy Ends MOW decals | Resin Casting | OOP check ebay or Train Swap meets |
| Freight car | Sunshine Models | 19.3 | HO | MP 36′ 120000 Steel Boxcar Indented Murphy Ends Eagle Merch. decals | Resin Casting | OOP check ebay or Train Swap meets |
| Freight car | Sunshine Models | 19.4 | HO | MP 36′ 120000 Steel Boxcar Dreadnaught Ends Eagle Merch. decals | Resin Casting | OOP check ebay or Train Swap meets |
| Freight car | Sunshine Models | 19.5 | HO | MP 36′ 120000 Steel Boxcar Murphy Ends Modified Eagle Merch. decals | Resin Casting | OOP check ebay or Train Swap meets |
| Freight car | Sunshine Models | 19.6 | HO | MP 36′ 120000 Steel Boxcar Dreadnaught Ends Modified Eagle Merch. decals | Resin Casting | OOP check ebay or Train Swap meets |
| Freight car | Sunshine Models | 19.7 | HO | MP 36′ 120000 Steel Boxcar Murphy Ends Route of the Eagles decals | Resin Casting | OOP check ebay or Train Swap meets |
| Freight car | Sunshine Models | 19.8 | HO | MP 36′ 120000 Steel Boxcar Dreadnaught Ends Route of the Eagles decals | Resin Casting | OOP check ebay or Train Swap meets |
| Freight car | Sunshine Models | 21.1 | HO | MP/IGN ARA 1932 Boxcar | Resin Casting | OOP check ebay or Train Swap meets |
| Passenger Car | Sunshine Models | 27.3 | HO | MP 53′ Express Reefer | Resin Casting | OOP check ebay or Train Swap meets |
| Freight car | Sunshine Models | 39.6 | HO | MP/IGN Howe Truss Radial Roof Boxcar. Murphy Ends | Resin Casting | OOP check ebay or Train Swap meets |
| Freight car | Sunshine Models | 39.7 | HO | IGN/NOT&M Howe Truss Radial Roof Boxcar. Murphy Ends | Resin Casting | OOP check ebay or Train Swap meets |
| Freight car | Sunshine Models | 39.8 | HO | MP Howe Truss Rebuild Route of the Eagles. Murphy Ends | Resin Casting | OOP check ebay or Train Swap meets |
| Freight Car | Sunshine Models | 39.9 | HO | MP Howe Truss Rebuild Eagle Merchandise Service. Murphy Ends | Resin Casting | OOP check ebay or Train Swap meets |
| Freight car | Sunshine Models | 39.10 | HO | MP Howe Truss Rebuild Route of the Eagles DN ends | Resin Casting | OOP check ebay or Train Swap meets |
| Freight car | Sunshine Models | 39.11 | HO | MP Howe Truss Rebuild Eagle Merchandise Service. DN Ends | Resin Casting | OOP check ebay or Train Swap meets |
| Freight car | Sunshine Models | 54.3 | HO | MP Stockcar 54000 series Steel Roof | Resin Casting | OOP check ebay or Train Swap meets |
| Freighjt car | Sunshine Models | 54.4 | HO | MP Stockcar 53850 series Wood Roof | Resin Casting | OOP check ebay or Train Swap meets |
| Freight car | Westerfield Models | 2001 | HO | T&P DS Wood Automobile boxcar | Resin Casting | Westerfield Web Site http://www.westerfieldmodels.com/58701.html |
| Freight car | Westerfield Models | 2051 | HO | T&P DS Wood boxcar | Resin Casting | Westerfield Web Site http://www.westerfieldmodels.com/58701.html |
| Freight car | Westerfield Models | 2052 | HO | T&P Rebuilt Boxcar | Resin Casting | Available through MPHS Company Store http://www.mopac.org/index.php/store |
| Freight car | Westerfield Models | 1901 | HO | Mopac 40′ Automobile boxcar 81000 series | Resin Casting | Available through MPHS Company Store http://www.mopac.org/index.php/store |
| Freight car | Westerfield Models | 1951 | HO | Mopac 40′ Single-sheathed 46000 Boxcar | Resin Casting | Available through MPHS Company Store http://www.mopac.org/index.php/store |
| Freight car | Westerfield Models | 8852 | HO | Mopac single deck stock car | Resin Casting | Available through MPHS Company Store http://www.mopac.org/index.php/store |
| Freight car | Westerfield Models | 8854 | HO | Mopac double deck stock car | Resin Casting | Available through MPHS Company Store http://www.mopac.org/index.php/store |
| Freight car | Westerfield Models | 6501 | HO | ART wood reefer Type 1B | Resin Casting | Westerfield Web Site http://www.westerfieldmodels.com/58701.html |
| Freight car | Westerfield Models | 6003 | HO | ART wood reefer Type 1A | Resin Casting | Westerfield Web Site http://www.westerfieldmodels.com/58701.html |
| Freight car | ARM/MPHS | HO | ART 1938 Scheme Steel Reefer belt rail | Plastic RTR | http://amarillorailmuseum.com/artreefer.html | |
| Freight car | ARM/MPHS | HO | ART 1951 Scheme Steel Reefer with belt rail | Plastic RTR | http://amarillorailmuseum.com/art_ph2.html | |
| Freight car | Exactrail | HO | Bethlehem 3737 hopper 1973 Small Eagle logo | Plastic RTR | https://www.exactrail.com/model-trains?scale=152 | |
| Freight car | Exactrail | HO | Bethlehem 3737 hopper 1973 CEI | Plastic RTR | https://www.exactrail.com/model-trains?scale=152 | |
| Freight car | Exactrail | HO | Bethlehem 3737 hopper 1974 TP lettering | Plastic RTR | https://www.exactrail.com/model-trains?scale=152 | |
| Freight car | Tangent Models | HO | Mopac PS PS-2CD 4740 Covered Hopper | Plastic RTR | https://www.tangentscalemodels.com/product/ps4740-missouripacific/ | |
| Freight car | Athearn | HO | Mopac Airslide MP 100-199 series built 1957-58 | Plastic RTR | Athearn MP Airslide Covered Hopper – ARM/MPHS Special Run | |
| Locomotive | LifeLike Proto 2000 | HO | Mopac PA-1 Original Eagle colors | Plastic RTR | OOP check ebay or train swap meets | |
| Locomotive | LifeLike Proto 2000 | HO | Mopac GP7 Original Eagle colors | Plastic RTR | OOP check ebay or train swap meets | |
| Locomotive | LifeLike Proto 2000 | HO | Mopac GP18 Original Eagle colors | Plastic RTR | OOP check ebay or train swap meets | |
| Locomotive | LifeLike Proto 2000 | HO | Mopac GP18 low nose Jenks Blue Alco trucks | Plastic RTR | OOP check ebay or train swap meets | |
| Locomotive | LifeLike Proto 2000 | HO | Mopac BL2 Original Eagle colors | Plastic RTR | OOP check ebay or train swap meets | |
| Locomotive | LifeLike Proto 2000 | HO | Texas & Pacific SW8 #812 and #817 | Plastic RTR | OOP | |
| Caboose | American Model Builders | 883 | HO | Mopac Drovers Caboose | Laser kit | http://mopac.org/index.php/store?start=24 |
| Caboose | American Model Builders | 884 | HO | Mopac Drovers LCL Version Caboose | Laser kit | http://mopac.org/index.php/store?start=24 |
| Locomotive | Athearn Genesis | HO | Mopac EMD F3 Original Eagle frt colors | Plastic RTR | OOP check ebay or train swap meets | |
| Locomotive | Athearn Genesis | HO | Mopac EMD F5 DC Original Eagle frt colors | Plastic RTR | OOP check ebay or train swap meets | |
| Locomotive | Athearn Genesis | HO | Mopac EMD F7 DC Original Eagle frt colors | Plastic RTR | OOP check ebay or train swap meets | |
| Locomotive | Athearn Genesis | HO | T&P EMD F7 Eagle Passenger colors | Plastic RTR | OOP check ebay or train swap meets | |
| Locomotive | Athearn Genesis | HO | T&P EMD F7 original Eagle frt colors | Plastic RTR | OOP check ebay or train swap meets | |
| Locomotive | Athearn Geneses | HO | Mopac EMD GP9 DCC/sound original ft colors | Plastic RTR | Currently available 4/2014 | |
| Locomotive | Athearn Genesis | HO | T&P EMD GP9 DCC/sound original ft colors | Plastic RTR | Currently available 4/2014 | |
| Caboose | Hallmark | HO | MP 700-800-900 class wood caboose | Brass model | Check ebay or Train swap meets. This class of caboose was done by Overland in brass and is a better model. | |
| Caboose | Hallmark | HO | T&P Short Muley caboose | Brass model | Check ebay or Train swap meets. | |
| Caboose | Hallmark | HO | MP Horizon wood sheathed caboose | Brass model | Check ebay or train swap meets | |
| Caboose | Hallmark | HO | KO&G steel center cupola caboose | Brass Model | Check ebay or train swap meets | |
| Caboose | Overland | HO | MP Standard Wood Caboose | Brass Model | Check ebay or train swap meets | |
| Caboose | Overland | HO | NOT&M wood caboose | Brass model | Check ebay or train swap meets | |
| Caboose | Overland | HO | MP cupola/bay window caboose | Brass model | Check ebay or train swap meets | |
| Caboose | Overland | HO | MP 1948 DeSoto riveted steel caboose | Brass model | Check ebay or train swap meets | |
| Caboose | Overland | HO | MP 1948 Sedalia welded caboose | Brass model | Check ebay or train swap meets | |
| Caboose | Overland | HO | MP Extended Vision Caboose | Brass Model | Check ebay or train swap meets | |
| Caboose | Overland | HO | MP Short Bay Window Caboose | Brass Model | Check ebay or train swap meets | |
| Caboose | Pecos River Brass | HO | T&P Steel Caboose – original version | Brass model | Check ebay or train swap meets | |
| Caboose | Pecos River Brass | HO | T&P Steel Caboose – modernized version | Brass model | Check ebay or trin swap meets | |
| Locomotive | Atlas Classic | 8420 | HO | T&P GP7 #1110 | Plastic | Painted Swamp Holly Orange & black |
| Freight car | Moloco Trains | HO | MP 780000 series Gen. Am. 50′ RBL 10′ 6″ Offset door | http://www.molocotrains.com/store/ga50rbls1-10-6offwideundeckit.html Decals for this car can be ordered here http://maskislanddecals.com/home.html | ||
| Locomotive | Proto 2000 | HO | MP 0-8-0 9601 USRA steam locomotive | |||
Originally posted by Ed Hawkins and Charlie Duckworth, 15 December, 2013